Novasredes
Redes de computadores experimentais
802.11s FC's TrunkServ Reticulum Yggdrasil network
Written by: Tristan Brice Velloza Kildaire
Date: Saturday the 3 March 2026
This section should look at client access
/64 or via some NATBoth of the following can be done so long. But the Ethernet one requires you have at least two WiFi interfaces.
In order to simplify the setup process specifics we create a bridge and then enslave one or both of the WiFi and Ethernet interfaces to it. From_here_ we then perform the required network configuration as then it isn’t tied to any of the one slave interfaces.
Let’s add the following entry in /etc/config/network:
config device 'accessbr0'
        option name 'accessbr0'
        option type 'bridge'
        list ports 'eth0'
        list ports 'accesswifi0'
This will define a bridge interface named accessbr0 and then will enslave the following interfaces:
eth0accesswifi0Only add a list ports entry for the interfaces you have/want bridged (take note of the opening paragraph of this section).
Really it is just added as a slave interface to the accessbr0 bridge so nothing needs to be done.
What we will be doing is using the same wifi-device or WiFi radio and adding an additional wifi-iface entry that uses that wifi-device.
So therefore, let’s add an entry like follows to our /etc/config/wireless:
config wifi-iface 'access_radio0'
	option device 'radio0'
	option ifname 'accesswifi0'
	option mode 'ap'
	option ssid 'Yggdrasil Access Node 2'
	option encryption 'sae'
	option key 'HateTheStateMate69'
Some of the parameters are:
encryption is set to sae for the standard encryption mechanism. It’s the same one as used for the 802.11s (mesh) wifi-iface.key is then the actual passphrasemode to ap as we want to create an access point (and not a mesh point like we did earlier)ssid is the name that will be advertised for our WiFi networkifname is the network interface name that will be created when this interface is brought up and will be how we send and receive traffic over this WiFi networkwifi-device or radio to use for this. We have set it to the same radio we used earlier; radio0.This is all that is needed to be done.
We now want to configure the accessbr0 bridge with IP addressing so that it can serve the Yggdrasil /64 prefix. This prefix lives in the 300::/8 subnet (it is a subset of it).
In order to configure our bridge device we need to add a new entry in our /etc/config/network in the form of an interface config like so:
config interface 'accessBridge'
	option device 'accessbr0'
	option proto 'static'
	option ip6assign '64'
	list ip6class 'ygg0'
The options are:
device to accessbr0 so as to state that we want to configure the addressing of this interfaceproto option to static/64 prefix as that may change if we ever regenerate our Yggdrasil’s public-private key pair. So then - is there anyway in order to get such addressing information dynamically from what the Yggdrasil daemon’s current keypair is?luci-proto-yggdrasil actually hooks into the UCI system in order to advertise an IPv6-PD (prefix delegation). What this means is that our prefix will be placed in the prefix pool which then any interface can grab at in order to have it applied as their addressing info.ip6assign means that from the pool we want to grab any prefix from the pool that matches the given prefix size, in this case /64 which we know is what will be made available from the ygg0 interface via the luci-proto-yggdrasillist ip6class entry is used to filter down the prefix pool search query down to prefixes being delegated by the given given interface. This is useful so that we don’t grab any other /64 that may be being advertised by interfaces other than our ygg0.TODO The parameters section may as well be split into mega-sections as each of these deserves having its own explanation
Our accessbr0 interface has addressing information assigned to it already via the IPv6-PD (prefix delegation) that we sourced from the ygg0 interface. However, this doesn’t mean anything for people connecting to this interface.
For that we want to enable SLAAC on accessbr0 so that this prefixing information and some (additionally configured) routing information can be advertised to connecting clients.
In order to configure SLAAC we must open the configuration file that deals with DHCP, RaDV etc. . This file is located at /etc/config/dhcp. We must create a new entry in it as follows:
config dhcp 'accessSlaac'
	option interface 'accessBridge'
	option start '100'
	option limit '150'
	option leasetime '12h'
	option ra 'server'
	list ra_flags 'none'
	option ra_default '2'

	list dns '324:71e:281a:9ed3::53'
	list dns '302:db60::53'
	list dns '300:6223::53'
	list dns '302:7991::53'
We must specify the interface config’s name that we wish to enable RaDV (router advertisements) for, in this case it would be accessBridge (see the earlier section for this).
We set the ra option to server as we want to be serving RaDV, as compared to relaying RaDV from other routers
We then set the ra_flags to none, this is important because by default it is set to other-config which is a mode whereby it will advertise options to the SLAAC client such as an external DHCPv6 server to use. We obviously don’t want this as we want the client to be forced to use SLAAC and not some yet-to-configure DHCPv6 server.
You should then see something like this (if you restart with service dnsmasq restart):
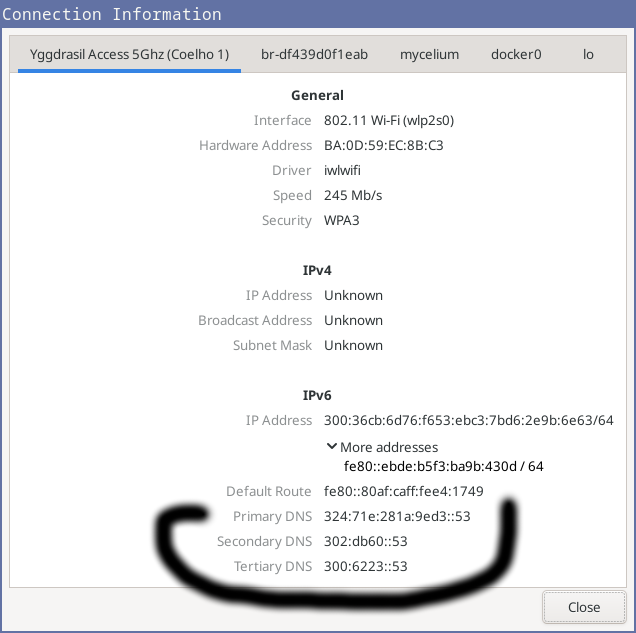
Network manager UI showing network information
We then set the ra_default option to 2. This mode forces the advertisement of a default route (a ::/0 route) to the SLAAC clients even if you don’t have such a route on the Yggdrasil machine.
200::/7 prefix.NOW I want to advertise just a prefix - maybe - to 200::/7. Maybe the default route is better - depends on the use case.
The list dns <...> parameters are to specify the DNS recursion servers that should be used for resolving domain names. It makes sense that these should be addresses to hosts that an Yggdrasil-only host can connect to because at the end of the day the SLAAC-configured hosts can only talk to machines on the Yggdrasil network.
The list ntp <...> is where we configure the NTP servers to advertise over SLAAC. This is indeed something that SLAAC can do; it can actually advertise a list of servers to the connecting host which allow it (the host) to sync up its clocks
ra_flags to other-config which will make our SLAAC server advertise additional flags like that there is a local DHCPv6 server availablelist ntp '202:a2a5:dead:ded:9a54:4ab5:6aa7:1645'
list ntp '223:180a:b95f:6a53:5c70:e704:e9fc:8b8f'
list ntp '200:8ce3:6def:9d4d:a976:9dfb:f0a6:91ce'
list ntp '201:72f6:9b56:e977:2d40:c7da:667b:f7a0'
dhcpv6 to 'server' which will enable the DHCPv6 serverjounalctl -f on my host machine (the one I am using to connect to the client access WiFi network) I see the following:
i.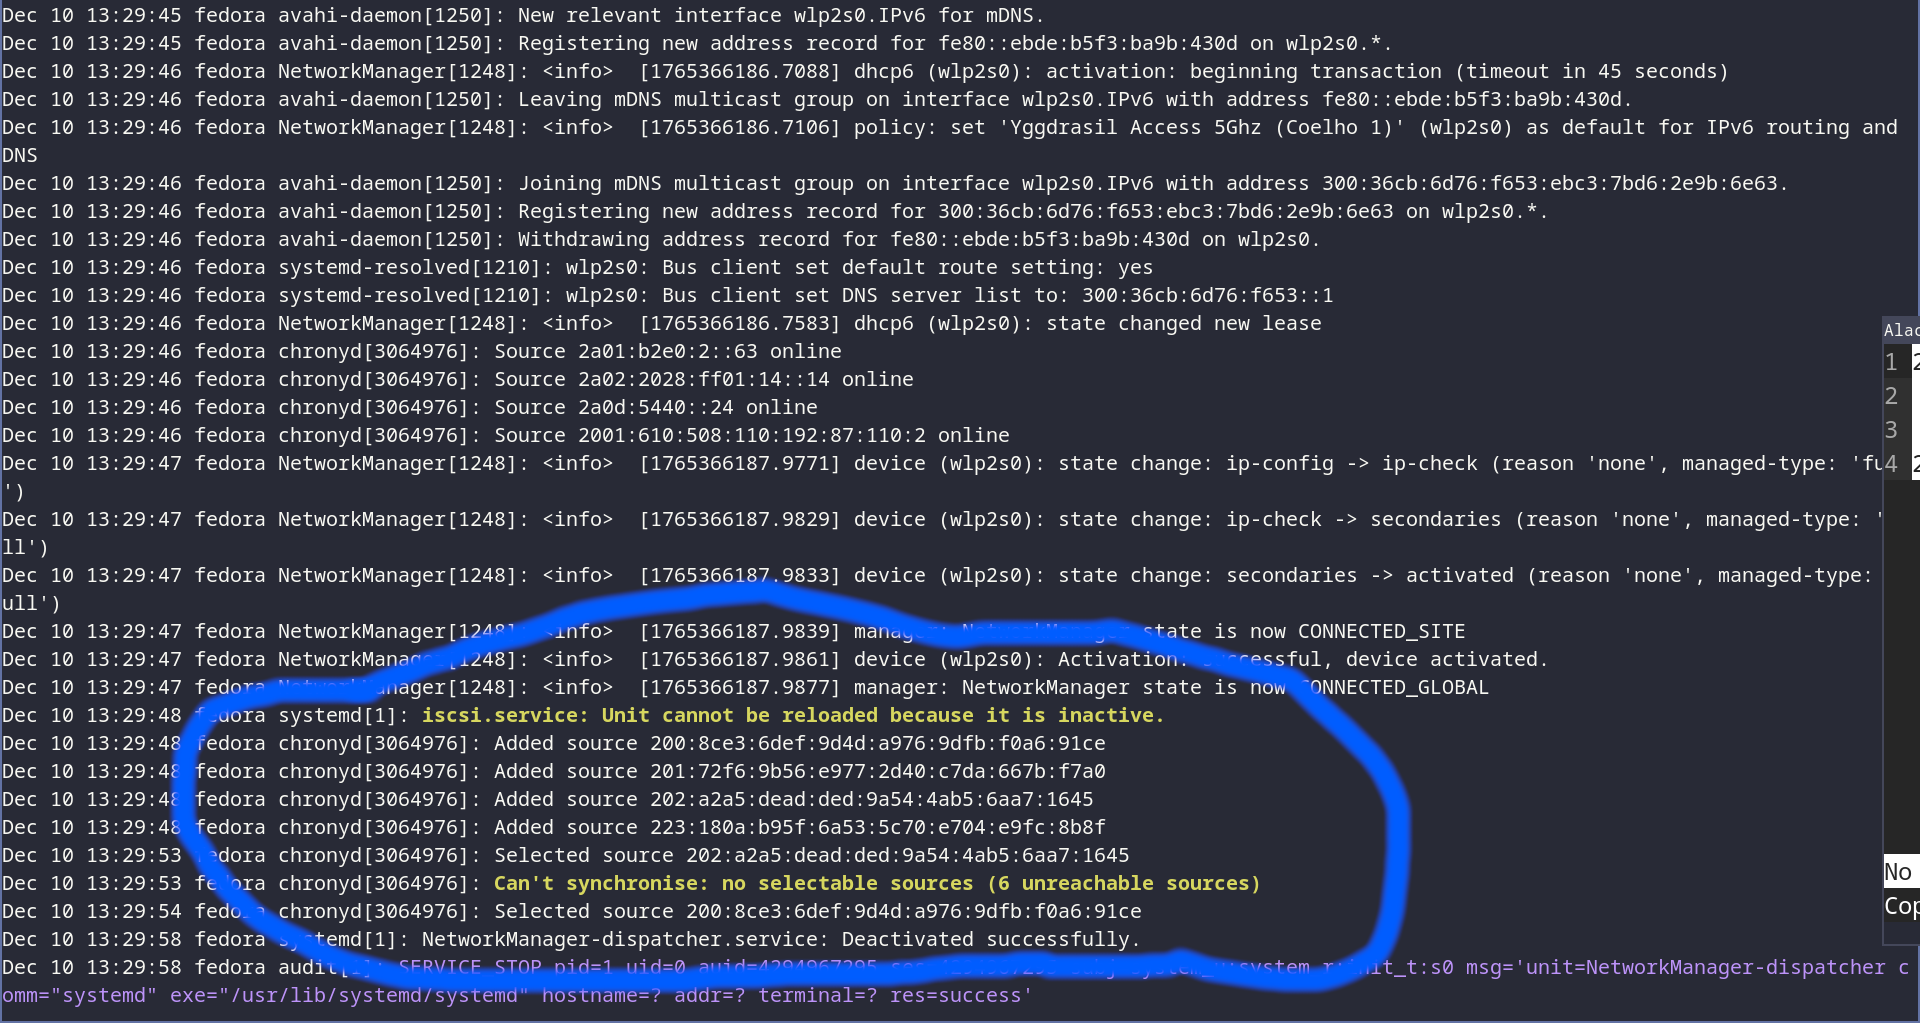
NTP sources being added dynamically
Lastly, there’s one more thing that we need to set before we can have clients connected via our accessbr0 able to forward packets to and from the Yggdrasil network via our router.
We will need to enable IP forwarding in order for packets received by our router’s accessbr0 but not destined to it will be forwarded on via the ygg0 interface. We can do this by editing the /etc/config/firewall file and set the following in the defaults section:
config defaults
    option forward 'ACCEPT'
The default value for forward is normally REJECT but we must set it to ACCEPT in order to enable IP forwarding
There is a better way to setup the DNS. We must leave the defaults as is an remove any of the list dns <...> entries in /etc/config/dhcp in the config dhcp 'accessSlaac' entry such that all we are left with. This is so that the default behaviour of OpenWRT can kick in which is to advertise the host itself as the DNS server.
The good thing about this is that the advertised router is an Yggdrasil IP, meaning that whenever the name server is advertised our SLAAC clients will retrieve a DNS server they can reach.
.meship and .ygg domainsIn order to do this we will configure our DNS server to, on behalf of us, use the following name servers in order to resolve domains in these TLDs for us.
In the config dnsmasq entry (the default entry), we will add the following entries:
config dnsmasq
	...

  list server '/*.ygg/324:71e:281a:9ed3::53'
  list server '/*.ygg/302:db60::53'
  list server '/*.ygg/300:6223::53'
  list server '/*.ygg/302:7991::53'
  list server '/*.meship/324:71e:281a:9ed3::53'
  list server '/*.meship/302:db60::53'
  list server '/*.meship/300:6223::53'
  list server '/*.meship/302:7991::53'
Each entry here describes two things on the syntax of /<regex>/<nameserver>
<regex> must contain a regular expression that matches the TLD you want to match against<nameserver> is the corresponding name server that is to be responsible for resolving any domains matching said <regex>You can add multiple entries for the same TLD regex matcher
Note: It also helps to restart
networksometimes in order to kick these changes into action
Now all the listed entries will be hidden and we will just use our _gateway as the DNS recursive resolver, which in turn will be able to query the recursive resolvers we configured:
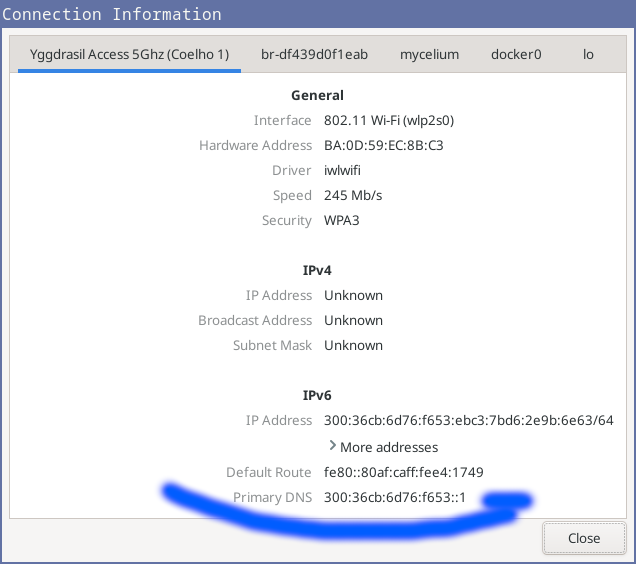
Network manager UI showing updated changes, now just a single upstream DNS provider - us!
The nice thing is that this approach lets our OpenWRT machine itself also resolve these new TLDs.
Along with this it also means that we can still resolve our standard domains via the nameserver configuration provided to us via DHCP/DHCPv6/SLAAC on our Internet-facing interface.
Note: For those who want to deploy a node without this, more work would be required.
Figure out how to get ourselves advertised automatically or just even maybe normally